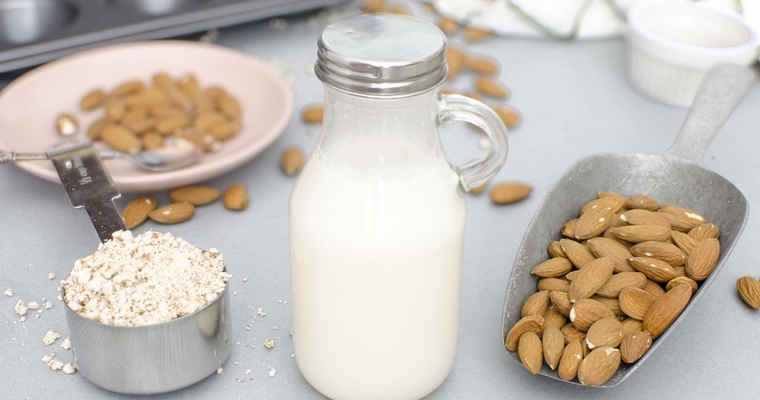
Useful guide to making delicious, Dairy-free nut milk. Tips for getting the creamiest texture and richest flavour, and how to make flour with leftover pulp.
Technique
01. What are nut milks?
02. What nuts can I use to make nut milk?
03. Why do you have to soak the nuts for so long?
04. What can I do with the leftover pulp?
05. Do I have to strain nut milk?
06. Why does nut milk separate?
07. Do I need to add an emulsifier?
07. Do I need to add a thickener?
09. How can I stop nut milk curdling in hot liquid?
10. Why make your own nut milk?
11. How long do nut milks keep, and how do I store it?
Recipes
12. Nut Milk Recipes
01. What are nut milks?
Nut ‘milks’ are an emulsion of ground nuts and water. They are made by grinding nuts to a paste and mixing vigorously with water until fully blended (preferably by combining in an electric blending). The mixture is then strained by bundling in a fine mesh material, like muslin or hemp, and ‘milking’ the bundle – the liquid is squeezed out drop-by-drop, leaving the ground nut fragments behind. This creates a smooth, thin liquid that can be used as a substitute for cow’s milk. Depending on the nut used, and whether they have been blanched to remove the skins, the liquid will usually be white in colour. Nut milks are not a recent food fad, and almond milk was a staple ingredient in medieval kitchens. Before the advent of electric refrigerators, nut milk offered a safe and reliable alternative to animal milk. It could also be served on religious fast days such as the period of Lent, when there was a restriction on the types of animal protein that could be eaten.
02. What nuts can I use to make nut milk?
You can make milk from any nut, following exactly the same method of blending 1 part nuts to 4 parts water (or 3 parts water for a creamier blend). You can also make plant-based milk from seeds, such as hemp, pumpkin and sunflower seeds. You can even create brand-new hybrid milks, by blending together your own mix of nuts and seeds. However, some nuts and seeds have a stronger taste than others, and will produce a less versatile milk. Hemp milk, for example, is quite earthy-tasting, and unsuitable for sweet recipes. Almonds, cashews, and macadamias add a creamy texture and a mild, buttery flavour, while walnuts and brazil nuts add bitter notes, and pecans and hazelnuts add sweetness. Nut milks made from almond, cashew and hazelnut are generally the most popular, but in part this is due to cost rather than the merits of taste alone. It’s better to use raw, unseasoned nuts, as roasted nuts can be too hard and too bitter for creating a subtle and creamy milk. For the same reason, it’s also better to skin the nuts before blending, to produce a lighter, cleaner flavour.
03. Why do you need to soak the nuts?
Leaving the nuts to soak in water for several hours before grinding serves two purposes. Firstly, it saturates and softens the nuts. This means that they grind into smaller particles, which blend more effectively into the water. This means that less nut meal gets left behind during the straining process, creating a thicker, creamier texture, and a stronger flavour. Proper, homemade milk will have a bright taste and deep, nutty flavours – almond milk, for example, will taste redolent of marzipan. Secondly, soaking removes phytic acid and increases digestibility. Phytic acid cannot be digested by humans, and irritates the gut. Nuts and seeds are the dormant germ of a new plant. They do not want to be eaten, and so they have developed a clever way of locking up their nutrients to resist digestion. Soaking tricks the nuts into waking up and releasing their nutrients.
(made more digestible)
(made more blendable)
(made more digestible)
(made more blendable)
04. What can I do with the leftover pulp?
After you have strained the milk, you will be left with a clump of wet nut meal. There’s no need to throw this away, as you can make use of it in other cooking projects. For example, the pulp can be used in baking recipes, where it can be added to batters for muffins, cookies and cakes. It can also be stirred into soups, stews and curries to act as a thickening agent, or sprinkled on top of baked dishes like crumbles, casseroles and meats to provide a textured crumb. Just remember that saturated meal will add liquid to the recipe, and take longer to brown. It will also weigh more than dry ground almonds, due to the water content, so you will need to increase the amount used if you are following a recipe. Due to the high water content, you should store wet meal in the fridge, and use within 2-3 days. Alternatively, you can dry out the pulp on a very low heat in the oven, then grind into a fine nut flour. As long as the meal has been completely dehydrated, it can be treated like any other dried product, and stored for several months in an airtight container.
05. Do I have to strain nut milk?
Straining the milk removes the ground nut particles, so that you end up with a smoother liquid. A double layer of muslin makes a cheap and effective strainer, although the mesh will wear out over time. I prefer to use a hemp nut milk bag, as it is harder wearing. In either case, rinse the mesh well after use in water (do not use detergent), and then wring out and leave to dry. Every second or third time, do a deeper clean by boiling the material in a saucepan of water for 10 minutes or so, to kill bacteria. Alternatively, you can leave the nut pulp in the milk. Some people prefer the more rustic texture of unstrained nut milk. I prefer the flavour and texture of strained almond milk, but when I make cashew milk I tend to leave it thick and unstrained. If you do decide to dispense with straining, you will need to give the bottle a good shake before using, as the solids will settle on the bottom.
06. Why does nut milk separate?
If you leave home-made nut milk in the fridge for a couple of days, you may notice that it starts to separate out into a white solid on the bottom and a clearer liquid on top. This is perfectly natural, and can be remedied by giving the bottle a vigorous shake. What is happening is that the emulsion is breaking down. An emulsion is a mixture of two liquids that should not normally stay combined. For example, oil does not dissolve in water, so nut fats will eventually separate out when blended with water. The same is true of unhomogenised cow’s milk, where the cream will rise to the top. Vigorous shaking breaks down the molecules, dispersing and suspending the fat particles in the water. However, this only creates a temporary emulsion, as the fat and water particles will be more attracted to themselves than to each other. Left to stand, the water and fat particles will re-form and separate.
07. Do I need to add an emulsifier?
Emulsions can be made stable by adding emulsifiers like egg yolk, mustard or xanthum gum. Emulsifiers contain proteins that coat the oil particles and so stop them from binding together again. They achieve this because the protein molecules have opposing ends; one end that attracts water, and one end that repels water. When the proteins coat the oil particle, the water-loving end faces outward, toward the water, preventing the oil particle from linking to other oil particles. If you look on the back of a shop-bought carton of nut milk, you will usually see an emulsifier like sunflower or soy lecithin printed on the ingredients list. These ensure that the milk maintains a consistent texture, which saves you from having to shake the carton before use. The downside to this is that some people are sensitive to emulsifiers, and it can trigger bloating and discomfort.
08. Do I need to add a thickener?
Nut milk tends to produce a fairly thin liquid, that is less viscous than cow’s milk. For this reason, commercial nut milks usually add a powdered starch like tapioca to act as a thickening agent. This sort of adulteration is unnecessary in home-made nut milk, where less invasive solutions are within your control. The most obvious thing you can do is simply increase the ratio of almonds to water, to create a thicker, creamier blend. However, this incurs a greater cost each time you make nut milk. The best solution is to gently heat the milk in a saucepan to just below boiling point. Once you see small bubbles barely breaking the surface, reduce the heat to a gentle simmer. Simmer for 10 minutes, stirring frequently. By this point, the milk will be noticeably thicker, with a viscosity that is closer to cream. Because emulsions are sensitive to changes in temperature, it is important to heat the milk gently, and to turn the heat down as soon as you see little bubbles breaking through the surface. If you heat to the milk all the way to boiling point, the finely ground nut particles will separate out, resulting in a grainy texture.
09. How can I stop nut milk curdling in hot liquid?
If you pour nut milk straight into a hot liquid, the milk will curdle. What will happen is that the fat will separate from the liquid, resulting in unsightly white blobs bobbing around in your cup of tea. This is because emulsions are particularly sensitive to changes in temperature. For this reason, nut milks are not always suitable replacements for cow’s milk in recipes that require heating milk to a high temperature. When it comes to stirring nut milks into hot drinks, you should allow the tea or coffee to cool slightly before adding. This doesn’t always happen with shop-bought cartons, because they contain emulsifiers.
10. Why make your own nut milk?
Homemade nut milk has no gut-irritating emulsifiers, thickeners or preservatives. For a time, I was using an app to log my digestive symptoms and keep a food diary. I was really surprised when almond milk came out at the top of the list of aggravating foods – that is, until I clocked all the extra ingredients listed on the side of the carton. Nut milks often contain thickeners like tapioca starch to mimic the viscosity of cow’s milk. This can be a problem if you are following a no-carb diet, like the Specific Carbohydrate Diet. But, even if you don’t have a sensitive gut, homemade nut milk has a vastly superior flavour, and a much creamier mouthfeel. This makes it a more direct replacement for the richness of cow’s milk when you are following a dairy-free diet.
11. How long do nut milks keep, and how do I store it?
Shop-bought nut milks are packaged in sealed containers, and then heated to remove all the air and bacteria. This creates a sterile environment that prevents spoilage – all the bacteria has been killed, and no new, air-borne bacteria can get in. Sterilised food can be kept indefinitely at room temperature, provided the seal remains intact. This is why you can buy almond milk from the shelf, rather than from the refrigeration section of the store. Only once a carton is opened, and the contents are exposed to air, does it need to be transferred to the fridge to slow the process of decay. Commercial nut milks will usually keep for 7-10 days in the fridge. Homemade nut milks have a much shorter shelf-life, as they do not contain preservatives. You can expect homemade almond milk to last about 5 days in the fridge, before it starts to develop a sour taste. Interestingly, I find that if I soak nuts beyond the recommended soaking times given above, it decreases the shelf-life. My theory is that this is because soaking tips into fermentation, causing the milk to sour quicker as the lactobacilli bacteria reproduce and build up lactic acid.


I am so pleased to find this blog, and just want to say thank you for the recipes, which look excellent, I plan to try a few, starting with the chestnut bread… thank you, its so helpful,
Thank you for the kind feedback 🙂