Ox cheeks are cooked slowly in red wine until meltingly soft and buttery in this rich winter stew. The Gluten-free sauce is naturally thickened by collagen.
Ox cheek is the cut of meat taken from the cow’s cheeks. Cows eat a diet based on grass and other coarse vegetation that is not easily digestible. In order to extract nutrients from this unpromising plant matter, cows spend up to eight hours a day constantly regurgitating and rechewing their food until it is digestible. All that jaw action means that the cheek muscles are very lean, and full of tough, connective tissue. Cheeks need to be cooked gently using indirect heat in order to break down the collagen. Low and slow cooking in a braising liquid like stock or wine breaks down collagen and converts it into silky smooth gelatine. This gives the meat a rich, buttery flavour, and thickens the cooking liquid. When cool, the enriched stock will set like jelly. The long cooking time – and, perhaps, a modern aversion to eating face meat – means that ox cheeks are not a popular cut, and can be picked up for a very reasonable price.
You can cook and serve ox cheeks whole if you prefer, but I find this makes dishing up tricky – ox cheeks come in irregular sizes, so it can be difficult to divide into equal portions. Instead, I suggest quartering each cheek before cooking, or using two forks to pull apart and shred the cheeks after cooking.
Tips & Tricks
- Fry the meat before braising it – this caramelises meat sugars on the surface, which develops the flavour
- Heat the pan to sizzling point – this creates an instant seal when the meat is added, preventing it from sticking and keeping the moisture locked in
- Do not overcrowd the pan – this will cause the meat to stew in its own juices rather than brown
- Cover for most of the cooking time – this traps the steam and stops the liquid from evaporating before the meat has finished cooking
- Skim off the oil – a greasy layer of fat is not appetising and dilutes the flavour
- Reduce the cooking liquid – this concentrates the flavour and creates a thick coating that clings to the meat rather than running off and pooling at the bottom of the plate
Ingredients
- 1 kg ox cheeks (replace with diced beef shin if you cannot find)
- 1/2 teaspoon freshly ground black pepper
- 1 teaspoon salt
- 2 tablespoons cooking oil (I used lard)
- 2 onions (260g), peeled and finely chopped
- 2 garlic cloves, peeled and minced
- 1 cup (240ml) red wine
- 2 tablespoons tomato purée
- 1 tablespoon fresh thyme, leaves only
- 5 juniper berries, crushed with the broad side of a heavy knife
- 2 star anise
- 2 bay leaves
- 200g (1/2 can) tinned chopped tomatoes
- 2 cups (480ml) homemade stock (I used chicken stock)
Instructions
- Brown the meat. Mix the salt and pepper in a large bowl. Quarter each ox cheek using a sharp meat knife. Rub the ox cheeks all over with the seasoning in the bowl.
- Heat the cooking oil in a heavy-based casserole over a medium-high heat. When a few drops of water sizzle and evaporate upon contact with the pan, add the ox cheeks. Sear the ox cheeks in 3-4 batches until browned all over with a caramelised crust – about 5 minutes a batch. Add more cooking oil if necessary. Do not overcrowd the pan. Transfer the browned meat back to the large bowl.
- Saute the onion and garlic. Reduce the heat to medium. Add the onion and fry for about 5 minutes, until translucent but not brown. Add the garlic and fry for another 2 minutes.
- Deglaze the pan. Add the wine to the casserole, and scrape off all the tasty browned bits from the bottom with a spatula. Turn up the heat to high and boil for 2-3 minutes to remove the alcohol.
- Simmer the stew. Tip the meat into the casserole, then add the remaining ingredients (tomato purée, thyme, juniper berries, star anise, bay leaves, tinned tomatoes, stock). The cheeks should be more-or-less submerged in liquid. Top up with a bit of extra stock / water if this is not the case. Bring to the boil, then reduce the heat to low. Cover, and leave to simmer gently for 3 hours. Uncover, and cook for 1 hour more, until tender.
- Traditionally, stews are made the day before they are to be eaten. This improves the flavour by allowing the spices to develop and meld together.
- If eating another day: leave to cool overnight in the refrigerator. After several hours chilling, the fat will rise to the top and congeal to form a solid layer on top. When you want to eat the stew, gently scrape off the fat with a metal spoon and discard. Bring to the boil, then follow the instructions below to reduce the sauce.
- if eating straight away: take the pan off the heat, and remove the meat using a slotted spoon. Wait for the oil to separate out and rise to the top. Tilt the pan, then lower in a metal spoon or ladle and scoop up the oil from the sides.
- Reduce the sauce. Remove the cheeks from the pan using a slotted spoon, and keep warm by covering in a double layer of tin foil. Turn the heat up to high and boil rapidly to reduce the cooking liquid to a thick sauce – about 20-30 minutes. Stir frequently towards the end to stop it from sticking to the bottom of the pan.
- Serve the ox cheeks as they are in large chunks, or use two forks to pull apart and shred the meat. Return the cheeks to the casserole, and mix until evenly coated in sauce. Transfer into a serving dish and serve hot.
Accompaniments

Gluten-free
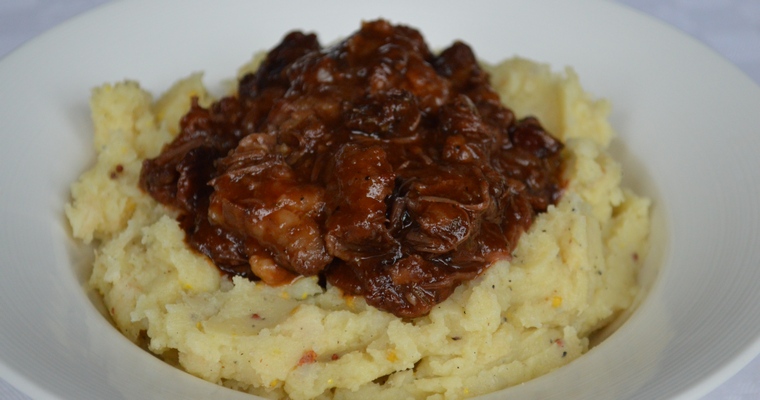
Polenta: Allow 50g per person. Cook 1 part polenta (50g) to 5 parts water (250ml) – or 1 part almond milk and 4 parts water for a creamier version. Bring the water to the boil, then reduce the heat to a low simmer and pour in the polenta in a steady stream, whisking constantly. Add seasoning, and keep stirring for the first couple of minutes until the mixture starts to thicken. Stir frequently until the polenta is cooked to the consistency of a thick porridge and starts to come away from the sides of the pan – about 45 minutes to 1 hour. Stir constantly for the final 10 minutes or so, to stop the polenta from sticking to the bottom of the pan. If you like, enrich by stirring in a couple of tablespoons of olive oil before serving.

Slow cooked .5kg of cheek for nearly 3 hours after browning. Beautiful butteriness and succulent taste. Great undiscovered cut. Should I have done it for longer?
Glad you enjoyed the cheeks, and you’re right that they are very under-utilised! Slow-cooking meat is not a precise science in terms of timings; it’s not like baking a cake where you have to slavishly follow very set instructions. The meat is done when it’s done – that is, when it’s tender and falls apart. In my experience, for ox cheeks, this is after around 4 hours on the stovetop (3 hours cooked with a lid on, and the final hour uncovered to allow the liquid to evaporate to thicken the sauce). But it will vary from cook-to-cook, according to the particular cut and the size of the pieces, and according to the cooking equipementused and heat applied. So really it’s just a case of using your judgement; if the meat fell apart under the fork and was buttery, then you cooked it perfectly. If it was a bit chewy, then you probably need to cook it for a bit longer next time.
So glad to find this version of Ox cheeck stew, Its always a winner this time of the year ( October ) I am really curious what you have served yours with as it sits on top of something that is either the Celeriac and Parsnip mash or Polenta ? Only I can see some other colors in this picture which is very intriguing !!
Autumn is my favourite food season – I love all the hearty, meaty stews and root vegetables . The mash in the photo is a celeriac mash – I made it in a similar way to the Celeriac & Parsnip Mash recipe, but just used celeriac, only roughly mashed it for a chunkier texture, and added some wholegrain mustard (which probably accounts for the other colours that you can see on the photo). This was before I discovered that adding a parsnip creates a smoother texture, and a slightly more neutral flavour that is good for offsetting the bold flavours in this recipe.