Thai curry paste that creates a delicate and fragrant curry. Simply add meat or vegetables and then stir in some coconut milk for an easy, Dairy-free curry.
| Skip straight to the recipe |
01. What is a Thai Green Curry?
Thai Green Curry is a mildly-spiced and fragrant curry that has a thin, almost soupy consistency and a fresh green colour. The body of the sauce comes from coconut milk, while the colour comes from pureed coriander leaves and green chillies. Compared to an Indian curry, it has fewer spices but a greater number of aromatics. This creates a fresher, brighter style of curry. A good Thai Green curry is a perfect balance of hot (chillies), sour (lime juice), sweet (coconut sugar) and salty (fish sauce). To me, the cornerstone to the dish is fresh lemongrass, which provides delicate and fragrant citrus notes. Their unique flavour cannot be replicated by using dried or pickled stalks from a jar, so you may need to make a trip to an Asian supermarket. Once sourced, they need to be bashed with a rolling pin or in a pestle and mortar to release the flavour, rather than chopped with blades.
02. How do you cook a curry?
Curries are liquid or semi-liquid dishes in which chopped vegetables or meats are braised in a smooth sauce that has been flavoured with spices and aromatics, and thickened without the use of flour. Despite fantastic regional diversity, the cooking method is remarkably similar for most curries. Most curries start with the aromatic flavour base of onion, ginger and garlic – in much the same way as most European dishes start with onion, carrot and celery. (For more information on cooking curries, read my article How to cook curries from scratch and with curry pastes.)
- aromatics: chopped onions are added to the pot first, and fried until their juices have been released and evaporated. Minced ginger and garlic are then added and fried only briefly, to avoid burning them and developing bitter flavours.
- spices: next, ground or whole or whole spices are added to the hot oil in order to release the flavour compounds. These are added in a particular sequence, as some spices need longer to cook out the raw flavour, while others burn very quickly.
- liquids: once the spices are fragrant, some form of liquid is added in order to stop the spices from sticking to the bottom of the pan and burning. This could take the form of chopped tomatoes, stock, coconut milk, cream, yoghurt, or just plain water.
- thickeners: a thin sauce will pool at the bottom of the plate, rather than clinging to the meat and vegetable pieces. Some liquids act as natural thickening agents, but, if a thin liquid like water is used, then pureed onion, peppers, ground nuts, or lentils can be added.
- main ingredient: now the main ingredient can be added. This could be chopped mixed vegetables, fish, diced meat, meat on the bone or pulses. If meat is used, it is common to tenderise it before cooking by massaging it with lemon juice and salt for 30 minutes, or to marinade it for several hours in a spice paste. Once the main ingredient has been added, the sauce is kept at a gentle simmer until the ingredients are tender and cooked.
- acids: adding a souring agent helps to brighten the dish and balance the flavours of sweet onions and creamy fats. They are usually added towards the end of cooking, as heating destroys the flavour of acids. Examples include lime juice, yoghurt, vinegar, tamarind, fruit or tomatoes.
03. What is a curry paste?
A curry paste is a wet spice mix made by blending ground spices with fresh ingredients like aromatics and herbs into a thick puree. Ground nuts and seeds may also be added, and the mixture may be loosened by adding liquid. Making a curry from scratch can be time consuming. Most of the hands-on time comes from the preparation of the aromatics and spices, which need to be measured out in exact quantities, and then ground or minced. Happily, it is a kitchen task that benefits from economies of scale – that is, it is actually easier to puree a whole head of garlic in the small bowl of a food processor, than it is to mince a couple of cloves on a chopping board with the back of a knife. For the same amount of work, you can make several extra portions of curry paste at the same time, and keep them in the fridge for a quick and easy meal.
04. How do I store home-made curry pastes?
A curry paste should be stored in a sterilised glass jar in the fridge. You can sterilise jars by putting them through the dishwasher on a rinse cycle without detergent, or by boiling in a large pan of water for 10 minutes, and then removing and leaving to air dry. Once the paste has been transferred to a jar, use the back of a spoon to press the mixture down and eliminate air bubbles. Pour a layer of neutral-tasting oil like light olive oil on top to create an airtight seal. This should be poured off before using. In the meantime, it stops airborne bacteria from getting in, and protects the surface from oxidising. Most sealed curry pastes will keep in the fridge for at least 3 months, although the flavour and colour will naturally degrade over time. For full potency, curry pastes are best eaten within 1-2 months. Curry pastes are not suited to freezing, as strong flavours intensify and change during frozen storage. You can home-can curry pastes using the water bath method, but only if they have high-acid ingredients like pureed tomatoes. Otherwise, you need to use a pressure canner to process the paste at a high enough temperature to kill botulism spores.
05. Can I prolong the shelf-life of a home-made curry paste?
If you are making curry pastes for longer storage (more than 1-2 months), you could add some natural preservatives to stop the fresh aromatics from going mouldy. Bacteria are living things, and rely on the presence of oxygen and water for growth. They cannot grow in acidic environments. Adding acidic liquids like vinegar, lemon juice or tomato puree means that the curry paste will keep for longer. This will change the flavour of the curry, and you may need to add some sugar to temper the acidity. Taste and adjust the seasoning a few minutes before serving, when the flavours have fully developed. If you don’t want to tinker with the recipe, then you can try to kill as much of the micro-organisms that naturally exist in food as possible before bottling. Gently fry the paste for a few minutes until it starts to steam.
06. How do I use curry pastes?
Because the spices are raw, curry pastes need to be fried in hot oil to release the flavours when used to cook a curry. As essential oils are not soluble in water, it is important not to introduce too much moisture to the pan during this ‘blooming’ stage. This is why any fresh aromatics like onion, garlic and root ginger are fried first, and cooked until their juices have been released and evaporated. The curry paste can then be added to the pan, and stirred constantly to prevent it from sticking to the bottom and burning. It is important to keep cooking the paste until the oil separates out. When this happens, the paste takes on a slightly curdled appearance as the oil oozes out to the sides and forms a greasy layer on top. This indicates that all the water has evaporated, allowing the temperature to exceed 100°C/210°F. This breaks down the heat-sensitive emulsion that kept the oil dispersed in the water. It is important to cook the curry paste to this stage, because higher temperatures are needed to develop the flavour, and stop the spices from tasting raw. Once this happens, the liquid base and the main ingredients can be added, just like cooking a curry from scratch.
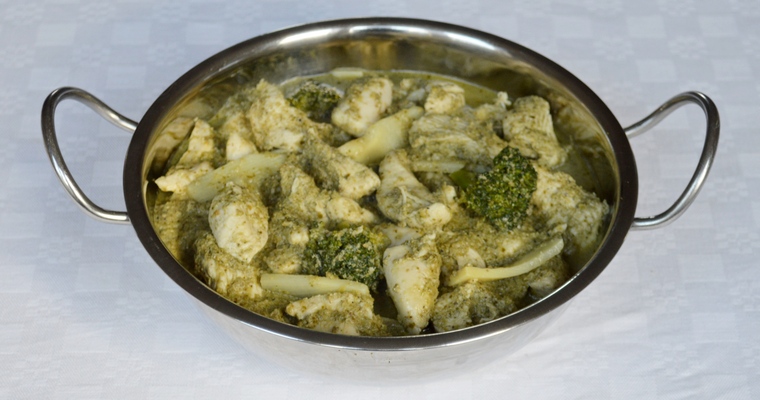
07. What dishes can I use a Thai Green Curry paste in?
Thai Green Curry is usually made with diced chicken breasts, but you can also use this paste with firm white fish (cod, tilapia, haddock, monkfish tail, huss), or with a mixture of soft vegetables (bamboo shoots, oyster mushrooms, aubergine) and firmer vegetables (sweet potato, broccoli, green beans, bell peppers, baby corn).
Recipes that use Thai Green paste:
Ingredients
whole spices:
- 2 tablespoons coriander seeds
- 1 tablespoon cumin seeds
- 2 teaspoons black peppercorns
- 8 keffir lime leaves, fresh or dried (if you cannot find, replace with finely grated zest of 1 organic lime)
fresh aromatics:
- 4 fresh lemongrass stalks
- 6-8 whole green bird’s eye chillies, stalks removed
- 3 thumb-sized pieces of root ginger (60g), peeled and roughly chopped
- 4 garlic cloves, peeled
- 200g shallots, peeled and roughly chopped
- large bunch of fresh coriander (100g), leaves only (unless the stems are young and tender, in which case include)
remaining ingredients:
- 6 tablespoons (90ml) olive oil / neutral-tasting oil
- juice of 1 lime (about 2 tablespoons)
- 2 teaspoons fish sauce
- 4 teaspoons coconut palm sugar
Instructions
- Toast the whole spices. Heat a large frying pan over a medium heat. Add the whole spices (coriander seeds, cumin seeds, black peppercorns and lime leaves) and dry fry for 1 – 2 minutes, or until they release a fragrant aroma.
- Grind the toasted spices. Tip the toasted spices into a spice grinder and grind until finely ground (if you do not have a spice grinder, then use a pestle and mortar or the small bowl of a food processor). Set aside.
- Pound the lemongrass. Cut off the woody root tip of each lemongrass stalk until you reach the purple-tinted rings. Trim off the top third of the dry stalk. Remove and discard the loose, dry outer layer, to expose a denser inner stalk. Finely slice the stalk into rings. Transfer to a pestle and mortar and pound to release the fragrant oils. Scrape into the large bowl of a food processor.
- Purée the aromatics. Add the remaining aromatics to the food processor (chillies, ginger, garlic, shallots and coriander). Blitz until smooth. If the paste needs loosening up, add a bit of the oil.
- Add the ground spices. Tip in the toasted spices, and the remaining paste ingredients (oil, lime juice, fish sauce and coconut palm sugar). Blitz to a smooth paste.
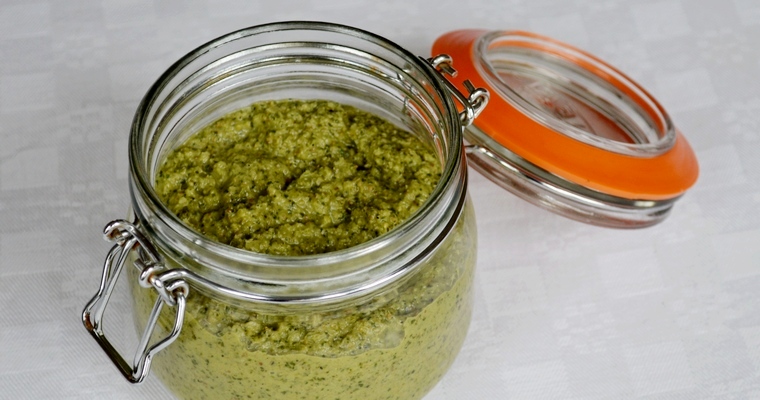
- Bottle the paste. Transfer the paste to a sterilised glass jar, using the back of a spoon to press the mixture down and eliminate air bubbles. Pour over a layer of neutral-tasting oil like light olive oil (this should be poured off before using). Seal, and transfer to the refrigerator. For best results eat within 1 month. If storing for longer than 1 month, fry the paste for a few minutes until it steams before bottling.